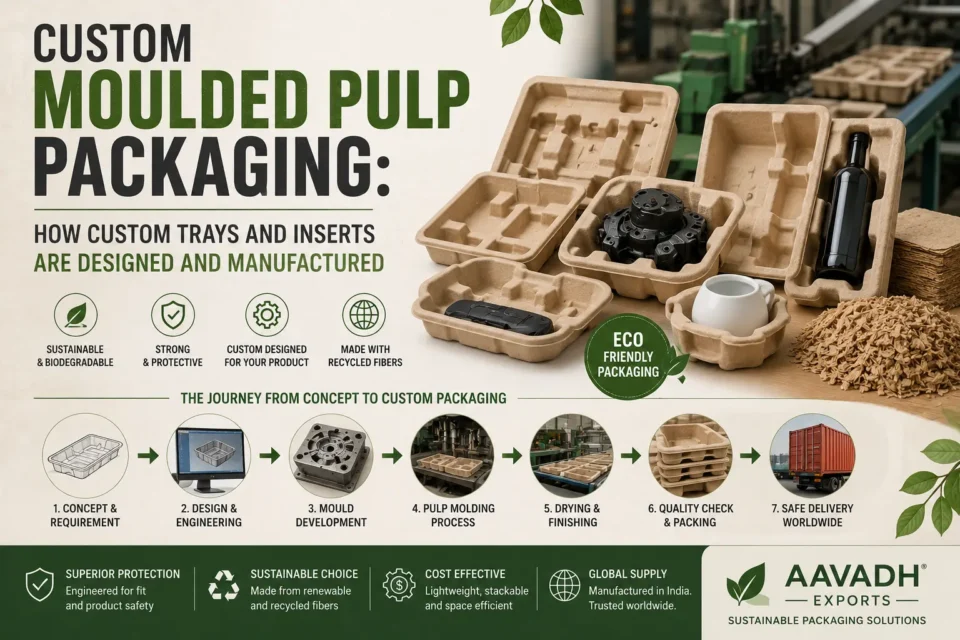
Standard moulded pulp trays — egg trays, generic fruit trays, basic dividers — work well for a lot of businesses. But once your product has a specific shape, needs a precise protective cavity, or is meant to reinforce your brand at the unboxing moment, a standard tray usually isn’t enough. That’s where custom moulded pulp packaging comes in: trays and inserts designed around your exact product, from a manufacturer that builds the mould specifically for you.
If you’re considering a custom packaging project for the first time, this article walks through exactly how the process works, what it typically costs, and how long it takes — so you know what to expect before you start.
When Standard Trays Aren’t Enough
A few signs it’s time to move from standard to custom tooling:
- Your product has an irregular shape that doesn’t fit a generic cell configuration
- You’re seeing damage or breakage with standard trays because the fit isn’t precise enough
- You want packaging that reinforces your brand — a recognisable shape, embossed logo, or specific finish
- You’re packaging multiple different components together that need separate, defined compartments
- Your current packaging wastes space (and shipping cost) because it wasn’t designed around your product’s actual dimensions
If any of these sound familiar, a custom mould is usually a better long-term investment than continuing to adapt a standard tray that’s only ever an approximate fit.
Step 1 — Sharing Your Product Dimensions & Requirements
Every custom project starts with the manufacturer understanding exactly what they’re designing for. At minimum, this means providing:
- Precise product dimensions — length, width, height, and weight of the item (or items) the tray needs to hold
- Fragility and pressure points — which parts of the product can bear weight safely, and which need extra clearance or cushioning
- Quantity per tray — whether the tray holds a single item or multiple items in defined compartments
- Any existing packaging or product drawings you already have, which speed up mould design significantly
- Branding requirements — if you want an embossed logo, specific color, or distinctive shape as part of the packaging itself
The more specific this initial brief is, the fewer revision cycles you’ll need later. Manufacturers with in-house design capability will often ask clarifying questions at this stage rather than guessing — a useful signal that they’re set up to do custom work properly rather than adapting a template.
Step 2 — Mould Design & Prototyping
Once your requirements are confirmed, the manufacturer develops a mould design, typically starting as a technical drawing or 3D model before any physical tooling is cut. This stage usually includes:
- Cavity design — mapping out exactly how the tray cradles your product, including wall thickness and support points
- Draft angles and structural considerations — moulded pulp needs specific angles and thicknesses to form and release from the mould correctly, which is where an experienced manufacturer’s engineering knowledge matters
- Nesting and stacking design — how multiple trays stack or nest together, which affects both shipping efficiency and stacking strength
After the design is finalized, a prototype mould is built and initial physical samples are produced. This is the point where an on-paper design gets tested against reality — and where adjustments are usually needed before locking in the final tooling.
Step 3 — Sample Approval
Physical samples are shipped to you for hands-on testing before any production commitment. At this stage, you should be checking:
- Fit — does your actual product sit securely in the cavity, with no excessive movement or awkward pressure points?
- Strength and rigidity — does the tray hold its shape under light pressure and stacking?
- Visual finish — if branding or a specific look is part of the requirement, does the sample meet expectations?
- Real-world handling — if possible, test the sample the way it will actually be shipped: stack it, apply light impact, simulate transit conditions
It’s common to need one or two rounds of revision at this stage — a good manufacturer will build this into the project timeline rather than treating the first sample as final. Don’t skip this step to save time; catching a fit or strength issue now is far cheaper than discovering it after a full production run.
Step 4 — Moving to Production
Once you’ve approved a sample, the manufacturer finalizes the production mould (which may differ slightly from the prototype tooling used for sampling) and schedules your order into their production line. At this stage, you should confirm:
- Minimum order quantity for the custom design, which is typically higher than a standard tray MOQ to justify the tooling investment
- Lead time from order confirmation to shipment-ready goods
- Quality control process for the production run, to ensure consistency matches the approved sample
- Reorder terms — since you’ve already invested in custom tooling, confirm how future reorders will be priced and scheduled
From here, the process runs similarly to a standard export order — production, quality check, export packing, and shipping documentation.
Typical Timelines & Costs for Custom Tooling
Timelines and costs vary significantly based on design complexity, but as a general guide:
- Simple custom trays (single cavity, minimal branding) — mould development and first samples typically take a few weeks
- Complex multi-cavity inserts (electronics, multi-component packaging) — design and prototyping can take longer, particularly if multiple sample revisions are needed
- Tooling cost is a one-time investment separate from the per-unit production cost, and is generally lower for moulded pulp than for equivalent plastic injection-mould tooling — one of the reasons custom pulp packaging is more accessible for mid-sized brands than custom plastic packaging often is
- Per-unit production cost for custom trays is usually only modestly higher than standard trays once the tooling is complete, since the underlying manufacturing process (pulping, forming, drying) doesn’t change
The realistic way to plan a custom project is to build in time for at least one sample revision cycle, and to treat the tooling cost as a fixed investment that pays off over the life of the mould rather than a per-order expense.
Industries That Commonly Need Custom Moulds
Custom moulded pulp packaging shows up most often in:
- Electronics — precise cavities for components with irregular shapes and fragile parts
- Footwear — shoe inserts shaped to specific shoe sizes and styles
- Cosmetics and personal care — branded, shaped inserts that double as part of the unboxing experience
- Medical devices and disposables — precise compartments for hygiene-sensitive or fragile items
- Specialty food and beverage — trays shaped for non-standard produce or multi-item gift packaging
- Industrial components — custom cavities protecting machined parts or fragile hardware during shipping
If your product doesn’t fit neatly into a standard tray category, there’s a reasonable chance a manufacturer has already solved a similar problem for another client in one of these categories — worth asking directly during your first conversation.
Start a Custom Packaging Project
Aavadh Exports develops custom moulded pulp trays and inserts in-house, from initial design through prototyping and production, for clients across the USA, UK, Australia, and Singapore. If you have a product that needs a precise protective fit or branded packaging, share your requirements and we’ll walk you through the design process.
Explore Our Products → Get a Quote →
📧 info@aavadhexports.com | 📞 +91 99 50 67 9838